> ## Documentation Index
> Fetch the complete documentation index at: https://docs-staging-feat-init-gt-translations.mintlify.site/llms.txt
> Use this file to discover all available pages before exploring further.
> Universal Login のブランディングオプションを使って、ユーザーに表示される多要素認証(MFA)ページをカスタマイズする方法を紹介します。
# 多要素認証ページをカスタマイズする
これらのカスタマイズは、独自のユーザーインターフェースを持つ Duo には適用されません。
MFA ページは、Auth0 Dashboard の [Universal Login Settings](https://manage.auth0.com/#/login_settings) セクションで Universal Login のブランディングオプションを調整することで、ユーザー向けにカスタマイズできます。
Universal Login エクスペリエンスを使用している場合は、そのフローのカスタマイズオプションを使用してページをカスタマイズできます。
HTML コンテンツ全体をカスタマイズして、組織固有のユーザーエクスペリエンス要件を反映させることもできます。詳しくは、[MFA Widget Theme Options](/docs/ja-jp/secure/multi-factor-authentication/customize-mfa/mfa-widget-theme-options) をご覧ください。
Universal Login エクスペリエンスでは、MFA はさらにシンプルな形でユーザーに表示されます。ログインのために資格情報を入力すると、MFA 画面が表示されます。MFA の認証要素をまだ登録していない場合は登録を求められ、登録済みの場合は MFA の資格情報の提示を求められます。
## MFA API を使用する
Auth0 では、次のシナリオ向けに [MFA API](/docs/ja-jp/secure/multi-factor-authentication/multi-factor-authentication-developer-resources/mfa-api) を提供しています。
* [リソース所有者パスワードグラントを使用してユーザーを認証する](/docs/ja-jp/secure/multi-factor-authentication/authenticate-using-ropg-flow-with-mfa)。
* [ユーザーが自身の認証要素を管理できるようにする](/docs/ja-jp/secure/multi-factor-authentication/manage-mfa-auth0-apis/manage-authenticator-factors-mfa-api) インターフェースを構築する。
* [登録チケット](/docs/ja-jp/secure/multi-factor-authentication/multi-factor-authentication-developer-resources/create-custom-enrollment-tickets) を使用して、ユーザーに MFA への登録を促す。
MFA API を使用するには、アプリケーションで MFA グラントタイプを有効にする必要があります。Auth0 Dashboard で MFA グラントを有効にするには、次の手順に従います。
1. [Auth0 Dashboard > アプリケーション > アプリケーション](https://manage.auth0.com/#/applications) に移動し、対象のアプリケーションを選択します。
2. **Settings** タブの下部で、**Advanced Settings** をクリックします。
3. **Grant Types** タブをクリックし、**MFA** を選択します。
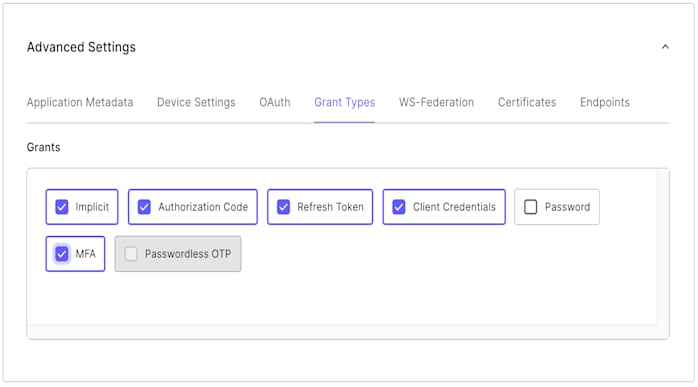 詳しくは、[多要素認証を有効にする](/docs/ja-jp/secure/multi-factor-authentication/enable-mfa) を参照してください。
4. **Save Changes** をクリックします。
詳しくは、[多要素認証を有効にする](/docs/ja-jp/secure/multi-factor-authentication/enable-mfa) を参照してください。
4. **Save Changes** をクリックします。
### 制限事項
MFA API は、SMS、Guardian アプリケーション内のプッシュ通知、メール、OTP の各認証要素に対応しています。Duo の登録には対応していません。
## Actions で MFA ポリシーをカスタマイズする
Actions を使用すると、特定のアプリケーションのユーザーや、特定のユーザーメタデータまたは IP 範囲に該当するユーザーに MFA を必須にするなど、テナントの MFA ポリシーをカスタマイズできます。
Actions の作成に慣れていない場合は、[Write Your First Action](/docs/ja-jp/customize/actions/write-your-first-action) を参照してください。
Actions で定義した MFA 関連の動作は、**Auth0 Dashboard** の **Multi-Factor Auth** セクションで設定した **Define policy** の設定より常に優先されます。
詳しくは、[Enable Multi-Factor Authentication](/docs/ja-jp/secure/multi-factor-authentication/enable-mfa) を参照してください。
Actions を作成する際は、`provider` 設定を使って、MFA を強制するかどうかや、使用する認証要素を指定できます。この動作は、クラシックログインと Universal Login エクスペリエンスのどちらを使用するかによって異なります。
| Provider | Classic Experience | New Experience |
| -------------------- | -------------------- | ---------------------------------------------------------- |
| any | Push、SMS、または OTP | Push、SMS、Voice、OTP、Email、または WebAuthN security key (有効な場合) |
| guardian | Push、SMS、または OTP | Push、SMS、OTP、または Email |
| google-authenticator | Google Authenticator | Push、SMS、OTP、または Email |
| duo | Duo | Duo |
Universal Login を使用している場合は、MFA ログインページのカスタマイズを有効にすることで、クラシックログイン エクスペリエンスと同じ動作にできます。
`guardian` と `google-authenticator` は、後方互換性のために残されているレガシー設定であり、今後は使用しないでください。代わりに `any` を使用することをお勧めします。`google-authenticator` オプションでは、ユーザーはリカバリーコードを登録できません。
`provider` を特定のオプションに設定すると、Auth0 Dashboard の有効/無効トグルよりもその設定が優先されます。次の Action を使用すると、Auth0 Dashboard で他の認証要素が有効になっている場合でも、ユーザーに Duo への登録を求めることができます。
```js lines theme={null}
exports.onExecutePostLogin = async (event, api) => {
// プロバイダーをプログラムでDuoに強制する
api.multifactor.enable('duo')
}
```
## 一般的なユースケースの例
以下は、Actions で対応できる、コンテキストに応じた MFA の一般的なシナリオです。
テナントで、MFA が Actions で明示的に要求された場合にのみトリガーされるようにするには、テナントの既定の MFA ポリシーを **Never** に設定します。
詳しくは、[多要素認証の認証要素](/docs/ja-jp/secure/multi-factor-authentication/multi-factor-authentication-factors#policies) の「Policies」セクションをご覧ください。
### 特定のアプリケーションで MFA を必須にする
MFA は、ユーザーが特定のアプリケーションにログインする場合にのみトリガーされるようにカスタマイズできます。
```js lines theme={null}
exports.onExecutePostLogin = async (event, api) => {
const CLIENTS_WITH_MFA = [
'{yourClientId1}',
'{yourClientId2}',
'{yourClientId3}'
];
if (CLIENTS_WITH_MFA.includes(event.client.client_id)) {
api.multifactor.enable('duo', { allowRememberBrowser: false })
}
}
```
### 特定のユーザーに MFA を必須にする
MFA を使用するよう指定されたユーザーに対してのみ MFA がトリガーされるように、設定をカスタマイズできます。
```js lines theme={null}
exports.onExecutePostLogin = async (event, api) => {
if (event.user.user_metadata && event.user.user_metadata.use_mfa) {
api.multifactor.enable('duo', { allowRememberBrowser: false });
}
}
```
### MFAプロンプトの頻度を変更する
場合によっては、同じブラウザーからログインするたびにユーザーにMFAを求めたくないことがあります。これがRemember Me機能で、ユーザーはログインページ上のチェックボックスで選択でき、ユニバーサルログインとクラシックログインではデフォルトで有効になっています。
「Remember Me」のSession Behaviorの有効期間をOktaの標準的な推奨設定より長く変更したことによって生じるセキュリティ体制の低下については、お客様の責任となります。
| **設定** | **デフォルト** | **範囲** |
| -------------------------------- | --------- | ------- |
| Idle Trusted Browser Lifetime | 7日 | 1時間~30日 |
| Maximum Trusted Browser Lifetime | 30日 | 1時間~90日 |
1. [**Auth0 Dashboard > Security > Multi-factor Auth**](https://manage.auth0.com/#/security/mfa)に移動します。
2. 下にスクロールして**Additional Settings**を表示します。
3. **Allow User to Skip MFA on Trusted Browsers**をオンにします。
4. **Remember browsers by default**チェックボックスを選択します。
5. **Idle Trusted Browser Lifetime**を日または時間単位で設定します。
6. **Maximum Trusted Browser Lifetime**を日または時間単位で設定します。
**必要なスコープ:** `read:tenant_settings` (GET) 、`update:tenant_settings` (PUT)
現在のGuardian設定を取得するには、`/api/v2/guardian/settings`に`GET`リクエストを送信します。
```bash cURL theme={null}
curl --request GET \
--url 'https://{YOUR_AUTH0_DOMAIN}/api/v2/guardian/settings' \
--header 'authorization: Bearer MGMT_API_ACCESS_TOKEN'
```
Guardian設定を更新するには、`/api/v2/guardian/settings`に`PUT`リクエストを送信します。
```bash cURL theme={null}
curl --request PUT \
--url 'https://{YOUR_AUTH0_DOMAIN}/api/v2/guardian/settings' \
--header 'authorization: Bearer MGMT_API_ACCESS_TOKEN' \
--header 'content-type: application/json' \
--data '{ "display_remember_me_checkbox": true, "remember_me_default_value": true, "mfa_session_inactivity_timeout": 604800, "mfa_session_overall_timeout": 2592000 }'
```
| **プロパティ** | **型** | **デフォルト** | **説明** |
| -------------------------------- | ----------- | --------------- | --------------------------------------------------------------------- |
| `display_remember_me_checkbox` | boolean | `false` | ユニバーサルログインのMFAプロンプトに**Remember this browser**チェックボックスを表示するかどうか。 |
| `remember_me_default_value` | boolean | `false` | **Remember this browser**チェックボックスをデフォルトでオンにするかどうか。 |
| `mfa_session_inactivity_timeout` | integer (秒) | `604800` (7日) | この期間操作がないと、ユーザーにMFAが求められます。`mfa_session_overall_timeout`を超えることはできません。 |
| `mfa_session_overall_timeout` | integer (秒) | `2592000` (30日) | 操作の有無にかかわらず、この期間を過ぎるとユーザーにMFAが求められます。 |
[Auth0 Actions Post-Login APIオブジェクト](/docs/ja-jp/actions/reference/post-login/post-login-api-object)の`allowRememberBrowser`プロパティを`true`に設定できます。
```js lines theme={null}
exports.onExecutePostLogin = async (event, api) => {
api.multifactor.enable('any', { allowRememberBrowser: true });
}
```
プロパティの値によって、動作は次のようになります。
| 値 | 説明 |
| ------- | -------------------------------------------------------------------------------------------------------------------------------------------------------------------------------------------------- |
| `true` | providerが`google-authenticator`または`duo`に設定されている場合、設定した信頼済みブラウザーの有効期間内では、セッションごとに1回だけユーザーにMFAが求められます。providerが`guardian`に設定されている場合は、MFAプロンプトに登録用チェックボックスが表示され、ユーザーは登録するかどうかを選択できます。デフォルトは`false`です。 |
| `false` | 認証するたびにユーザーにMFAが求められます。 |
これらの時間の値は、アクティブなユーザーに適用されます。ユーザーが一定期間操作を行わなかった場合はCookieが期限切れとなり、Remember Meの設定にかかわらず、次回のログイン試行時にMFAが求められます。
ユーザーにMFAのスキップを許可すると、ユーザーのブラウザーにCookieが保存されます。Cookieが設定されている状態でもMFAを必須にしたい場合は、次の2つの方法があります。
* `allowRememberBrowser`を`false`に設定する
* `/authorize`エンドポイントを呼び出す際に、`acr_values`を`http://schemas.openid.net/pape/policies/2007/06/multi-factor`に設定する
ユーザーが信頼済みデバイスを紛失した場合は、Auth0 の Management API [Invalidate Remember Browser](https://auth0.com/docs/api/management/v2#!/Users/post_invalidate_remember_browser) エンドポイントを呼び出すことで、そのユーザーに次回のログイン時に MFA を求めることができます。
### ネットワーク外のユーザーに MFA を必須にする
指定した内部 IP アドレスのネットワークへのアクセスが適切に管理されていることを前提に、Auth0 では、社内ネットワークの外部からリクエストを送信したユーザーに対してのみ MFA を要求することもできます。
```js lines theme={null}
exports.onExecutePostLogin = async (event, api) => {
const ipaddr = require('ipaddr.js@1.9.0');
const corp_network = '192.168.1.134/26';
const current_ip = ipaddr.parse(event.request.ip);
if (!current_ip.match(ipaddr.parseCIDR(corp_network))) {
api.multifactor.enable('any', {allowRememberBrowser: false});
}
}
```
### リフレッシュトークンのリクエストではMFAを回避する
ユーザーから頻繁にログアウトされるという報告がある場合は、MFAを使用している際にリフレッシュトークンのリクエストではMFAを回避する必要があるかもしれません。`event.transaction.protocol` オブジェクトプロパティに対するフィルター Action を使って、既定の動作を変更できます。
```js lines theme={null}
exports.onExecutePostLogin = async (event, api) => {
if (event.transaction.protocol !== 'oauth2-refresh-token') {
// MFA関連のコマンドをここに記述
api.multifactor.enable('any');
}
};
```
Action `event` オブジェクトの詳細については、[Actions Triggers: post-login - Event Object](/docs/ja-jp/customize/actions/explore-triggers/signup-and-login-triggers/login-trigger/post-login-event-object)を参照してください。
## 詳しくはこちら
* [クラシックログイン向けに MFA をカスタマイズする](/docs/ja-jp/secure/multi-factor-authentication/customize-mfa/customize-mfa-classic-login)
* [MFA でリソース所有者パスワードフローを使用して認証する](/docs/ja-jp/secure/multi-factor-authentication/authenticate-using-ropg-flow-with-mfa)
* [Auth0 MFA API](/docs/ja-jp/secure/multi-factor-authentication/multi-factor-authentication-developer-resources/mfa-api)
* [Authentication API を使用して認証要素を管理する](/docs/ja-jp/secure/multi-factor-authentication/manage-mfa-auth0-apis/manage-authenticator-factors-mfa-api)
* [MFA Widget のテーマオプション](/docs/ja-jp/secure/multi-factor-authentication/customize-mfa/mfa-widget-theme-options)
* [MFA テーマの Language Dictionary](/docs/ja-jp/secure/multi-factor-authentication/customize-mfa/mfa-theme-language-dictionary)